shader入门基础-屏幕后处理效果
shader入门基础-屏幕后处理效果
Unity 中实现屏幕后处理效果
在摄像机中添加一个用于屏幕后处理的脚本,在这个脚本中,我们会实现 OnRenderImage 函数来获取当前屏幕的渲染纹理。然后在调用 Graphics.Blit 函数使用 特定的 Unity Shader 来对当前图像进行处理,再把返回的渲染纹理显示到屏幕上。
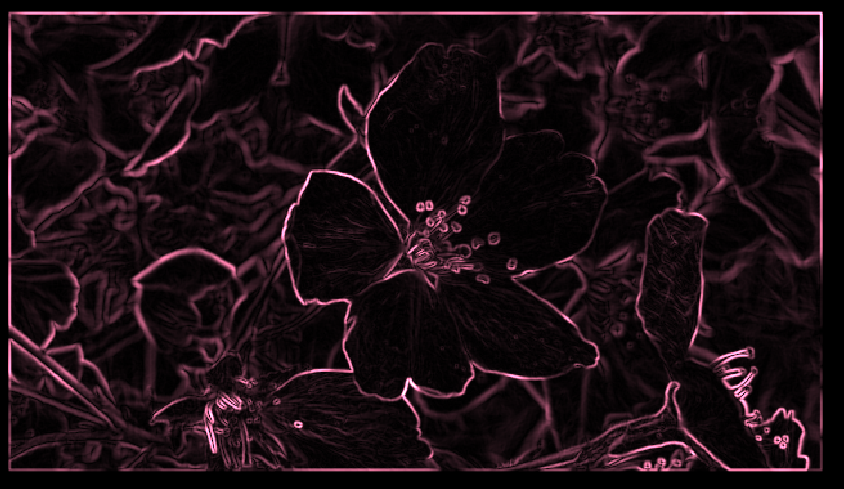
边缘检测
卷积
这里本人并不清楚卷积的意义,参考了 CSDN @LianYueBiao 的博客 原文参考链接
图像卷积
1
2
3
4
5
6
7
8
9
10
11
12
13
14
15
16
17
18
19
20
21
22
23
24
25
26
27
28
29
30
31
32
33
34
using UnityEngine;
using System.Collections;

public class EdgeDetection : PostEffectsBase {

	public Shader edgeDetectShader;
	private Material edgeDetectMaterial = null;
	public Material material {
		get {
			edgeDetectMaterial = CheckShaderAndCreateMaterial(edgeDetectShader, edgeDetectMaterial);
			return edgeDetectMaterial;
		}
	}

	[Range(0.0f, 1.0f)]
	public float edgesOnly = 0.0f;

	public Color edgeColor = Color.black;

	public Color backgroundColor = Color.white;

	void OnRenderImage (RenderTexture src, RenderTexture dest) {
		if (material != null) {
			material.SetFloat("_EdgeOnly", edgesOnly);
			material.SetColor("_EdgeColor", edgeColor);
			material.SetColor("_BackgroundColor", backgroundColor);

			Graphics.Blit(src, dest, material);
		} else {
			Graphics.Blit(src, dest);
		}
	}
}
1
2
3
4
5
6
7
8
9
10
11
12
13
14
15
16
17
18
19
20
21
22
23
24
25
26
27
28
29
30
31
32
33
34
35
36
37
38
39
40
41
42
43
44
45
46
47
48
49
50
51
52
53
54
55
56
57
58
59
60
61
62
63
64
65
66
67
68
69
70
71
72
73
74
75
76
77
78
79
80
81
82
83
84
85
86
87
88
89
90
91
92
93
94
95
96
97
Properties {
		_MainTex ("Base (RGB)", 2D) = "white" {}
		_EdgeOnly ("Edge Only", Float) = 1.0
		_EdgeColor ("Edge Color", Color) = (0, 0, 0, 1)
		_BackgroundColor ("Background Color", Color) = (1, 1, 1, 1)
	}
	SubShader {
		Pass {
			ZTest Always Cull Off ZWrite Off
			//Blend One OneMinusSrcAlpha
			CGPROGRAM

			#include "UnityCG.cginc"

			#pragma vertex vert
			#pragma fragment fragSobel

			sampler2D _MainTex;
			//xxx_TexelSize是Unity为我们提供访问xxx纹理对应的每个纹素大小。
			//例如一张512X512大小的纹理,则该值为1/512
			//卷积需要对相邻区域内的纹理进行采样,因此我们需要利用_MainTex_TexelSize来计算各个相邻区域的纹理坐标。
			uniform half4 _MainTex_TexelSize;
			fixed _EdgeOnly;
			fixed4 _EdgeColor;
			fixed4 _BackgroundColor;

			struct v2f {
				float4 pos : SV_POSITION;
				half2 uv[9] : TEXCOORD0;
			};

			v2f vert(appdata_img v) {
				v2f o;
				o.pos = UnityObjectToClipPos(v.vertex);

				half2 uv = v.texcoord;
				//Sobel算子采样时对应的9个领域纹理坐标
				o.uv[0] = uv + _MainTex_TexelSize.xy * half2(-1, -1);
				o.uv[1] = uv + _MainTex_TexelSize.xy * half2(0, -1);
				o.uv[2] = uv + _MainTex_TexelSize.xy * half2(1, -1);
				o.uv[3] = uv + _MainTex_TexelSize.xy * half2(-1, 0);
				o.uv[4] = uv + _MainTex_TexelSize.xy * half2(0, 0);
				o.uv[5] = uv + _MainTex_TexelSize.xy * half2(1, 0);
				o.uv[6] = uv + _MainTex_TexelSize.xy * half2(-1, 1);
				o.uv[7] = uv + _MainTex_TexelSize.xy * half2(0, 1);
				o.uv[8] = uv + _MainTex_TexelSize.xy * half2(1, 1);

				return o;
			}

			//计算亮度值
			fixed luminance(fixed4 color) {
				return  0.2125 * color.r + 0.7154 * color.g + 0.0721 * color.b;
			}

			//sobel 算子 滤波?
			//计算梯度值
			half Sobel(v2f i) {
				// const half Gx[9] = {-1,  0,  1,
				// 						-1,  0,  1,
				// 						-1,  0,  1};
				// const half Gy[9] = {-1, -1, -1,
				// 						0,  0,  0,
				// 						1,  1,  1};
				const half Gx[9] = {-1,  0,  1,
										-2,  0,  2,
										-1,  0,  1};
				const half Gy[9] = {-1, -2, -1,
										0,  0,  0,
										1,  2,  1};

				half texColor;
				half edgeX = 0;
				half edgeY = 0;
				for (int it = 0; it < 9; it++) {
					texColor = luminance(tex2D(_MainTex, i.uv[it]));
					edgeX += texColor * Gx[it];
					edgeY += texColor * Gy[it];
				}

				half edge = 1 - abs(edgeX) - abs(edgeY);

				return edge;//返回梯度值
			}

			fixed4 fragSobel(v2f i) : SV_Target {
				half edge = Sobel(i);

				fixed4 withEdgeColor = lerp(_EdgeColor, tex2D(_MainTex, i.uv[4]), edge);
				fixed4 onlyEdgeColor = lerp(_EdgeColor, _BackgroundColor, edge);
				return lerp(withEdgeColor, onlyEdgeColor, _EdgeOnly);
 			}

			ENDCG
		}
	}
	FallBack Off
高斯模糊
高斯是一个正方形大小的滤波核,其中每个元素的计算都是基于下面的高斯方程。 
\(\sigma\) 是标准方差,一般取值 1,x,y 分贝对应了当前位置到卷积核的中心的距离。高斯核的维度越高,模糊的程度越大。使用一个 NXN 的高斯核对图像进行卷积滤波,需要 NXNXWXH 次采样,其中 W H 分别对应了图像的宽和高。当 N 增大时,采样次数会急剧增大。我们可以这个二维 高斯函数拆成两个一维高斯函数。我们可以使用两个一维的的高斯核先后对图像进行滤波。
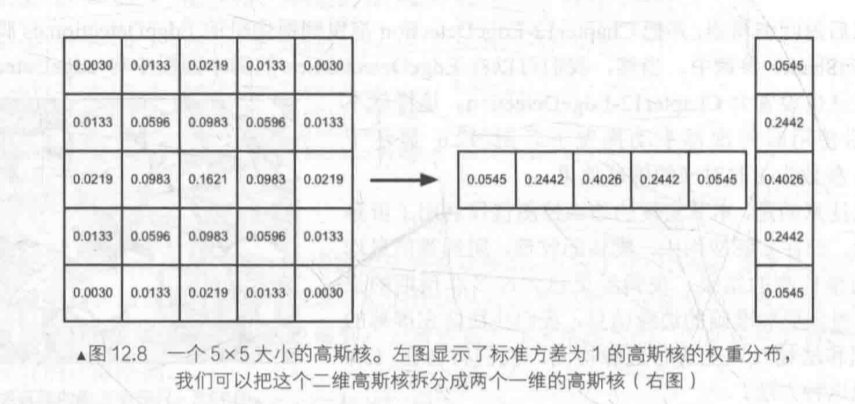
高斯模糊需要调用两个 Pass,第一个 pass 使用竖直方向一维高斯核进行滤波就,第二个 pass 使用水平方向一维高斯核进行滤波。
1
2
3
4
5
6
7
8
9
10
11
12
13
14
15
16
17
18
19
20
21
22
23
24
25
26
27
28
29
30
31
32
33
34
35
36
37
38
39
40
41
42
43
44
45
46
47
48
49
50
51
52
53
54
55
56
57
58
59
60
61
62
63
64
65
66
67
68
69
70
71
72
73
74
75
76
77
78
79
80
81
82
83
84
85
86
87
88
89
90
91
92
93
94
95
96
97
98
99
100
101
102
103
using UnityEngine;
using System.Collections;

public class GaussianBlur : PostEffectsBase {

	public Shader gaussianBlurShader;
	private Material gaussianBlurMaterial = null;

	public Material material {
		get {
			gaussianBlurMaterial = CheckShaderAndCreateMaterial(gaussianBlurShader, gaussianBlurMaterial);
			return gaussianBlurMaterial;
		}
	}

	// Blur iterations - larger number means more blur.
	[Range(0, 4)]
	public int iterations = 3;

	// Blur spread for each iteration - larger value means more blur
	[Range(0.2f, 3.0f)]
	public float blurSpread = 0.6f;

	[Range(1, 8)]
	public int downSample = 2;

	/// 1st edition: just apply blur
//	void OnRenderImage(RenderTexture src, RenderTexture dest) {
//		if (material != null) {
//			int rtW = src.width;
//			int rtH = src.height;
//			RenderTexture buffer = RenderTexture.GetTemporary(rtW, rtH, 0);
//
//			// Render the vertical pass
//			Graphics.Blit(src, buffer, material, 0);
//			// Render the horizontal pass
//			Graphics.Blit(buffer, dest, material, 1);
//
//			RenderTexture.ReleaseTemporary(buffer);
//		} else {
//			Graphics.Blit(src, dest);
//		}
//	}

	/// 2nd edition: scale the render texture
//	void OnRenderImage (RenderTexture src, RenderTexture dest) {
//		if (material != null) {
//			int rtW = src.width/downSample;
//			int rtH = src.height/downSample;
//			RenderTexture buffer = RenderTexture.GetTemporary(rtW, rtH, 0);
//			buffer.filterMode = FilterMode.Bilinear;
//
//			// Render the vertical pass
//			Graphics.Blit(src, buffer, material, 0);
//			// Render the horizontal pass
//			Graphics.Blit(buffer, dest, material, 1);
//
//			RenderTexture.ReleaseTemporary(buffer);
//		} else {
//			Graphics.Blit(src, dest);
//		}
//	}

	/// 3rd edition: use iterations for larger blur
	void OnRenderImage (RenderTexture src, RenderTexture dest) {
		if (material != null) {
			//降采样,采样是原来的 1/downSample ss
			int rtW = src.width/downSample;
			int rtH = src.height/downSample;

			RenderTexture buffer0 = RenderTexture.GetTemporary(rtW, rtH, 0);
			buffer0.filterMode = FilterMode.Bilinear;

			Graphics.Blit(src, buffer0);

			for (int i = 0; i < iterations; i++) {
				material.SetFloat("_BlurSize", 1.0f + i * blurSpread);

				//分配一块屏幕大小缓冲区
				RenderTexture buffer1 = RenderTexture.GetTemporary(rtW, rtH, 0);

				// Render the vertical pass
				Graphics.Blit(buffer0, buffer1, material, 0);
				//释放缓冲
				RenderTexture.ReleaseTemporary(buffer0);
				buffer0 = buffer1;
				buffer1 = RenderTexture.GetTemporary(rtW, rtH, 0);

				// Render the horizontal pass
				Graphics.Blit(buffer0, buffer1, material, 1);

				RenderTexture.ReleaseTemporary(buffer0);
				buffer0 = buffer1;
			}

			Graphics.Blit(buffer0, dest);
			RenderTexture.ReleaseTemporary(buffer0);
		} else {
			Graphics.Blit(src, dest);
		}
	}
}
1
2
3
4
5
6
7
8
9
10
11
12
13
14
15
16
17
18
19
20
21
22
23
24
25
26
27
28
29
30
31
32
33
34
35
36
37
38
39
40
41
42
43
44
45
46
47
48
49
50
51
52
53
54
55
56
57
58
59
60
61
62
63
64
65
66
67
68
69
70
71
72
73
74
75
76
77
78
79
80
81
82
83
84
85
86
87
88
89
Properties {
		_MainTex ("Base (RGB)", 2D) = "white" {}
		_BlurSize ("Blur Size", Float) = 1.0
	}
	SubShader {
		CGINCLUDE

		#include "UnityCG.cginc"

		sampler2D _MainTex;
		half4 _MainTex_TexelSize;
		float _BlurSize;

		struct v2f {
			float4 pos : SV_POSITION;
			half2 uv[5]: TEXCOORD0;
		};

		v2f vertBlurVertical(appdata_img v) {
			v2f o;
			o.pos = UnityObjectToClipPos(v.vertex);

			half2 uv = v.texcoord;

			o.uv[0] = uv;
			//偏移后的uv
			o.uv[1] = uv + float2(0.0, _MainTex_TexelSize.y * 1.0) * _BlurSize;
			o.uv[2] = uv - float2(0.0, _MainTex_TexelSize.y * 1.0) * _BlurSize;
			o.uv[3] = uv + float2(0.0, _MainTex_TexelSize.y * 2.0) * _BlurSize;
			o.uv[4] = uv - float2(0.0, _MainTex_TexelSize.y * 2.0) * _BlurSize;

			return o;
		}

		v2f vertBlurHorizontal(appdata_img v) {
			v2f o;
			o.pos = UnityObjectToClipPos(v.vertex);

			half2 uv = v.texcoord;

			o.uv[0] = uv;
			o.uv[1] = uv + float2(_MainTex_TexelSize.x * 1.0, 0.0) * _BlurSize;
			o.uv[2] = uv - float2(_MainTex_TexelSize.x * 1.0, 0.0) * _BlurSize;
			o.uv[3] = uv + float2(_MainTex_TexelSize.x * 2.0, 0.0) * _BlurSize;
			o.uv[4] = uv - float2(_MainTex_TexelSize.x * 2.0, 0.0) * _BlurSize;

			return o;
		}

		fixed4 fragBlur(v2f i) : SV_Target {
			float weight[3] = {0.4026, 0.2442, 0.0545};

			fixed3 sum = tex2D(_MainTex, i.uv[0]).rgb * weight[0];

			for (int it = 1; it < 3; it++) {
				sum += tex2D(_MainTex, i.uv[it*2-1]).rgb * weight[it];
				sum += tex2D(_MainTex, i.uv[it*2]).rgb * weight[it];
			}

			return fixed4(sum, 1.0);
		}

		ENDCG

		ZTest Always Cull Off ZWrite Off

		Pass {
			NAME "GAUSSIAN_BLUR_VERTICAL"

			CGPROGRAM

			#pragma vertex vertBlurVertical
			#pragma fragment fragBlur

			ENDCG
		}

		Pass {
			NAME "GAUSSIAN_BLUR_HORIZONTAL"

			CGPROGRAM

			#pragma vertex vertBlurHorizontal
			#pragma fragment fragBlur

			ENDCG
		}
	}
	FallBack "Diffuse"
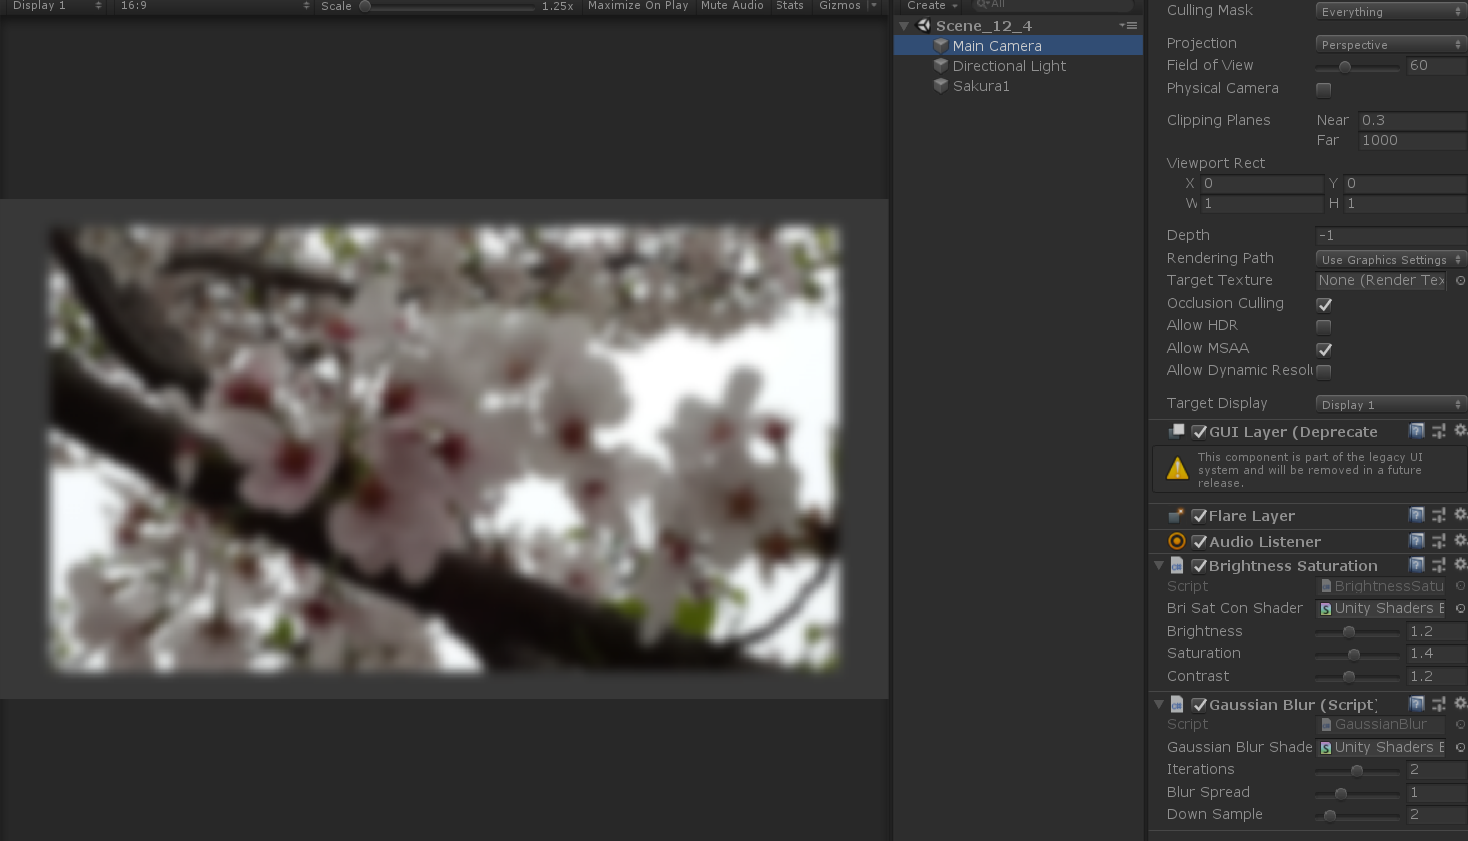
调整屏幕亮度,饱和度,对比度
基本概念
不清楚屏幕亮度,饱和度,对比度的定义,这里参考了 csdn 博客,大家可以直接参考 @feilong_csdn【数字图像处理系列二】基本概念:亮度、对比度、饱和度、锐化、分辨率
实现
屏幕后处理效果基类
1
2
3
4
5
6
7
8
9
10
11
12
13
14
15
16
17
18
19
20
21
22
23
24
25
26
27
28
29
30
31
32
33
34
35
36
37
38
39
40
41
42
43
44
45
46
47
48
49
50
51
52
53
54
55
56
57
58
59
60
61
using UnityEngine;
using System.Collections;

[ExecuteInEditMode]
[RequireComponent (typeof(Camera))]
public class PostEffectsBase : MonoBehaviour {

	// Called when start
	protected void CheckResources() {
		bool isSupported = CheckSupport();

		if (isSupported == false) {
			NotSupported();
		}
	}

	// Called in CheckResources to check support on this platform
	protected bool CheckSupport() {
		if (SystemInfo.supportsImageEffects == false || SystemInfo.supportsRenderTextures == false) {
			Debug.LogWarning("This platform does not support image effects or render textures.");
			return false;
		}

		return true;
	}

	// Called when the platform doesn't support this effect
	protected void NotSupported() {
		enabled = false;
	}

	protected void Start() {
		CheckResources();
	}

	// 创建material 这里如果不传入material 将会创建一个material 的实例
	protected Material CheckShaderAndCreateMaterial(Shader shader, Material material) {
		if (shader == null) {
			return null;
		}

		if (shader.isSupported && material && material.shader == shader)
			return material;

		if (!shader.isSupported) {
			return null;
		}
		else {
			material = new Material(shader);
			material.hideFlags = HideFlags.DontSave;
			if (material)
			{
				//返回创建的material
				return material;
			}
			else
				return null;
		}
	}
}
亮度,对比度,饱和度的实现
1
2
3
4
5
6
7
8
9
10
11
12
13
14
15
16
17
18
19
20
21
22
23
24
25
26
27
28
29
30
31
32
33
34
35
36
37
38
39
using UnityEngine;
using System.Collections;

public class BrightnessSaturationAndContrast : PostEffectsBase {

	public Shader briSatConShader;
	//可以省略Properties中的属性声明,Properties中声明的属性仅仅为了显示在材质面板中
	//对于屏幕特效来说,材质都是临时创建的,这些参数我们会从脚本中直接传递
	private Material briSatConMaterial;
	public Material material {
		get {
			briSatConMaterial = CheckShaderAndCreateMaterial(briSatConShader, briSatConMaterial);
			return briSatConMaterial;
		}
	}

	[Range(0.0f, 3.0f)]
	public float brightness = 1.0f;

	[Range(0.0f, 3.0f)]
	public float saturation = 1.0f;

	[Range(0.0f, 3.0f)]
	public float contrast = 1.0f;

	//渲染图像时,检查材质是否可用
	void OnRenderImage(RenderTexture src, RenderTexture dest) {
		if (material != null) {
			material.SetFloat("_Brightness", brightness);
			material.SetFloat("_Saturation", saturation);
			material.SetFloat("_Contrast", contrast);
			//Graphics.Blit 将把第一个参数传递给名为_MainTex的属性,因此必须声明一个_MainTex的纹理属性。
			Graphics.Blit(src, dest, material);
		} else {
			Graphics.Blit(src, dest);
		}
	}
}
1
2
3
4
5
6
7
8
9
10
11
12
13
14
15
16
17
18
19
20
21
22
23
24
25
26
27
28
29
30
31
32
33
34
35
36
37
38
39
40
41
42
43
44
45
46
47
48
49
50
51
52
53
54
55
56
57
58
59
60
61
62
63
64
65
66
67
68
69
70
Properties {
		_MainTex ("Base (RGB)", 2D) = "white" {}
		_Brightness ("Brightness", Float) = 1
		_Saturation("Saturation", Float) = 1
		_Contrast("Contrast", Float) = 1
	}
	SubShader {
		Pass {
			ZTest Always Cull Off ZWrite Off

			CGPROGRAM
			#pragma vertex vert
			#pragma fragment frag

			#include "UnityCG.cginc"

			sampler2D _MainTex;
			half _Brightness;
			half _Saturation;
			half _Contrast;

			// struct appdata_img
			// {
			// 	float4 vertex : POSITION;
			// 	half2 texcoord : TEXCOORD0;
			// 	UNITY_VERTEX_INPUT_INSTANCE_ID
			// };


			struct v2f {
				float4 pos : SV_POSITION;
				half2 uv: TEXCOORD0;
			};

			v2f vert(appdata_img v) {
				v2f o;

				o.pos = UnityObjectToClipPos(v.vertex);

				o.uv = v.texcoord;

				return o;
			}

			fixed4 frag(v2f i) : SV_Target {
				fixed4 renderTex = tex2D(_MainTex, i.uv);

				// Apply brightness
				fixed3 finalColor = renderTex.rgb * _Brightness;

				// Apply saturation
				//计算亮度值 通过对每个颜色分量乘以一个特定的系数再相加得到当前像素亮度值
				fixed luminance = 0.2125 * renderTex.r + 0.7154 * renderTex.g + 0.0721 * renderTex.b;
				//饱和度为0的颜色值,使用_Saturation对上一步得到的颜色之间进行插值,从而得到希望的饱和度颜色
				fixed3 luminanceColor = fixed3(luminance, luminance, luminance);
				finalColor = lerp(luminanceColor, finalColor, _Saturation);

				// Apply contrast
				fixed3 avgColor = fixed3(0.5, 0.5, 0.5);
				//对比度
				finalColor = lerp(avgColor, finalColor, _Contrast);

				return fixed4(finalColor, renderTex.a);
			}

			ENDCG
		}
	}

	Fallback Off
本文由作者按照 CC BY 4.0 进行授权